Microsoft PowerPoint can be a powerful yet simple tool to create digital content. This article describes how you can change the resolution, aspect ratio and design format of a PowerPoint presentation in PowerPoint to fit your screen.
Set custom slide size
When you are starting on a new PowerPoint presentation from scratch or when using your company profile template, the default slide size and resolution may not be optimal for what you are trying to do.
- Open your PowerPoint presentation and select the Design tab.
- Select Slide Size and select Custom Slide Size.
- Select Custom and enter your custom height and width.
If you don't know what measurements to enter, please check the list below. - Select OK (If prompted, then select Maximize)
You have now saved a new custom design, aspect ratio, and resolution of the PowerPoint presentation you are working on. Meaning you have ensured that the content will be optimal on your screen and not look "stretched" or "pixelated."
Tip: We recommend you check out the Databeat PowerPoint Publisher Plugin. Our user friendly plugin can help save time and energy when creating content and of course allow you publish your presentation as pictures or video to DatabeatOMNI directly from PowerPoint!
Tip: Setting custom slide size can help you create content in different sizes and formats. I.E. to create custom size banners for websites, content for video walls with a special aspect ratio or even to create content for Social Media!
Slide size measurements in PowerPoint
PowerPoint's default measurement is in centimeters or inches, but when it comes to creating content for screens, you need to think about pixels instead!
Here is a list that can save you some time when setting up a new widescreen presentation.
If you are creating content for portrait/vertical screens, swap width, and height.
| Name | Width px | Width cm | Height px | Height cm |
| HD | 1280 px | 33,867 cm | 720 px | 19,05 cm |
| Full HD | 1920 px | 50,8 cm | 1080 px | 28,575 cm |
| WQHD | 2560 px | 67,733 cm | 1440 px | 38,1 cm |
| 4K UHD | 3840 px | 101,6 cm | 2160 px | 57,15 cm |
Meaning 1 px = 0,026458333 cm if you want to calculate your own.
Tip: We recommend not going below Full HD (1920x1080) when creating content for a default Widescreen. To optimize please check out the resolution of your screen.
Tip: In PowerPoint you may be able to enter your custom height and width in pixels by simply swapping "cm" for "px" to indicate you want pixels instead of centimeters. I.E. instead of entering "28,575 cm", try entering "1080 px" and see for yourself!
But why is this important?
To help prove the point and importance of adjusting your slide size to an optimal resolution, please take a look at the comparisons between different resolutions below. This picture illustrates the difference from qHD (Remember 540p on YouTube?) all the way the newest standardized 4K UHD resolution that you might have on your consumer TV at home.
Please note that they all have the same aspect ratio (16:9) and that Full HD is a quarter of a 4K UDH display. Check out Wikipedia's article on Graphic display resolutions if you want to learn more.
With this in mind, it is essential to know that when you publish content with low resolution to a screen that has a high resolution, it will be upscaled.
Here is a simplified comparison between the same logo in decent quality versus an inferior quality version, which is upscaled to the same size. This illustrates how your content will look bad and "pixelated" on a screen.
What to do if my PowerPoint language is set to Norwegian?
- Select Utforming in PowerPoint

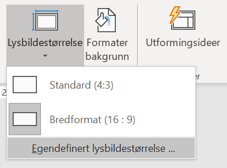
- Select Lysbildestørrelse and select Egendefinert lysbildestørrelse.

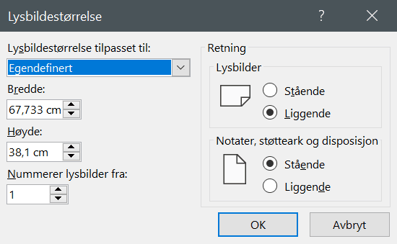
- Select Egendefinert and enter your custom Bredde and Høyde.


