
In this article, we will guide you on how to use the custom template feature in Databeat Doorsign to edit a coded template and display a nickname or short name for the meeting room instead of the original display name.

By implementing this customization, you can ensure that the displayed room name aligns with what users commonly refer to, providing a more user-friendly experience.
Table of contents
Creating a custom Doorsign Design template
- Go to Doorsign settings with the preview.
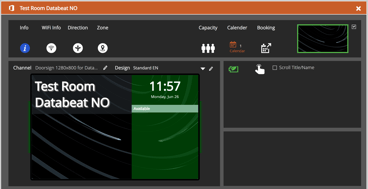
Go to the Location tab to view existing Doorsign Players and double-click to edit.
The Default Standard EN template shows the full Display Name directly from Exchange. 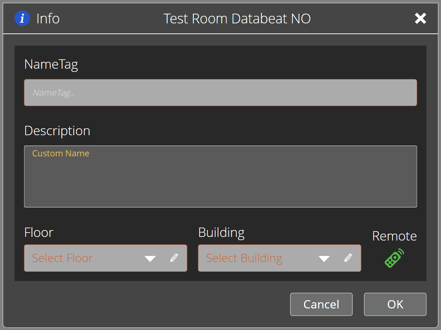 Select the blue Info button and add Custom Name to Description and select Save.
Later on, the template will replace the full Display Name with what you saved in the Description.
Tip: You can also use Direction, in case Description is already in use.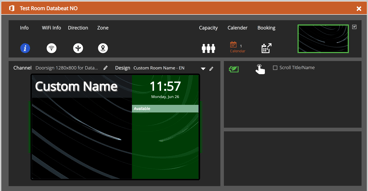
- Create a New Design Template by clicking the Edit button next to the Design Template Name.
Tip: The Edit custom template button requires the user role: "Developer". Click here to read more about Users and Roles.
In the Edit Dynamic Template UX, you can copy the defaults, play around, test and edit.
Check out the example code below for further instructions about editing. - When you are happy with the result, save it as a new custom template which will be linked to your DatabeatOMNI account.
Remember to select your new custom design template in the dropdown list and save the new Doorsign configuration. The Doorsign will be instantly updated with the new design. Please use the Screen Shot feature to test remotely and verify your new design.
Tip: There are additional options available when customizing a Doorsign template beyond just using the Description or Direction fields. For more guidance, be sure to consult the Template Guidelines and Documentation, which can be accessed through links at the bottom of the Dynamic Template Editor UX.
Code snippets (examples)
Flexible Name
We recommend using the flexible alternative prioritizing Direction if found, and Department if not.
This could be useful if using Databeat Booking combined with Databeat Doorsign to display different properties throughout your custom Booking and Meeting Room experience.
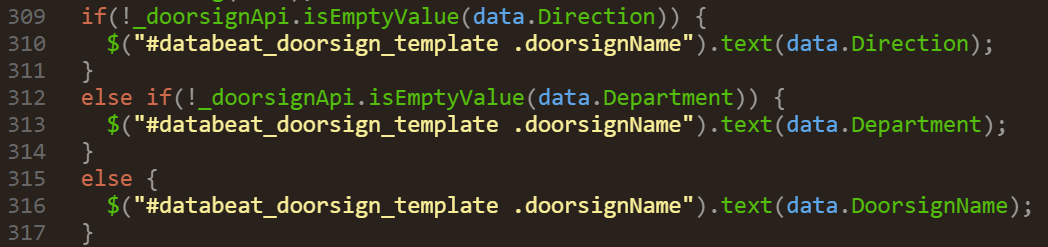
Explaining the code:
The first if statement will check if the "Direction" field is filled in.
It will use its value and set it as the DoorSignName if it is.
The second statement will check the Department field and use that if it is filled in.
If none of the two are filled in, the code will use the original Display Name in Exchange.
//Name Priority: 1 = Direction if found --> 2 = Department if found --> 3 = DoorsignName

 if(!_doorsignApi.isEmptyValue(data.Direction)) {
    $("#databeat_doorsign_template .doorsignName").text(data.Direction);
  }
  else if(!_doorsignApi.isEmptyValue(data.Department)) {
    $("#databeat_doorsign_template .doorsignName").text(data.Department);
  }
  else {
    $("#databeat_doorsign_template .doorsignName").text(data.DoorsignName);
  }
Using the "Direction" Property:
If you want to display the room name based on the "Direction" property, follow these steps:
- Open the custom template code for Databeat Doorsign.
- Locate the section where the display name is being set. It is usually represented as:
$("#databeat_doorsign_template .doorsignName").text(data.DoorsignName); - Replace data.DoorsignName with data.Direction, like this:
$("#databeat_doorsign_template .doorsignName").text(data.Direction); - Save the changes to the custom template code.
- Apply the modified template to the Databeat Doorsign device.
Using the "Description" Property:
If you prefer to utilize the "Description" property for the custom display name, follow these instructions:
- Access the custom template code for Databeat Doorsign.
- Locate the section where the display name is set, which is usually represented as:
$("#databeat_doorsign_template .doorsignName").text(data.DoorsignName); - Replace data.DoorsignName with data.Description, like this:
$("#databeat_doorsign_template .doorsignName").text(data.Description); - Save the changes to the custom template code.
- Apply the modified template to the Databeat Doorsign device.
Conclusion
By following the steps outlined above, you can customize the display name for Databeat Doorsign using the custom template feature. Whether you choose to use the "Direction" property, or "Description" property, or implement a flexible alternative, you can ensure that the displayed room name is more intuitive and user-friendly.
If you encounter any difficulties or have further questions, please reach out to our support team at support.databeat.net for assistance. We can also provide custom template design as a service if you do not have the time and resources to create your own.