
PLEASE NOTE !
- To set this up, a Microsoft 365 Admin must log in - using the Microsoft 365 Log-In button and his/her Microsoft credentials - to set and accept the required permissions to be granted to the DatabeatOMNI platform.
Without this, users will not have access to the Microsoft 365 features. - In the same way, users must be signed with their Microsoft 365 credentials to use these features. It is their - delegated - Microsoft 365 permissions that are used.
(See below for more info on "Delegated" vs "Application" permission) - More information: Microsoft's own documentation on Delegated vs Application permissions and MS Graph overview.
List of Content
About Microsoft permissions
DatabeatOMNI uses Microsoft Graph to access the Microsoft 365 infrastructure, and permission to do so is required. There are two types of permissions; Delegated and Application. The difference between them is significant. In short:
- Delegated permissions: Allows the Databeat platform (the "app") to pass through and let signed-in and Microsoft 365 authenticated users access Microsoft 365 resources with the same permissions they have in their Microsoft 365 environment.
- Application permissions: Allows the Databeat platform (the "app") to access and use (read or write as you choose) Microsoft 365 resources directly without a signed-in user present.
Typical scenarios for Application permissions are when using a DATABEAT doorsign touchscreen to:
- Confirm that a meeting has started
- Extend an ongoing meeting
- Book an available Microsoft 365 resource (ie a meeting room).
- Search for and book a Microsoft 365 resource (ie a meeting room)
- Another scenario for using Application permission is when organisations need to allow external tenants (not only internal users) to book Microsoft 365 resources with DATABEATbooking.
Info: Some customers create a dedicated and separate tenant/domain with required Microsoft 365 permissions for Application permissions/external access rather than using their own internal domain.
Find and set the permissions
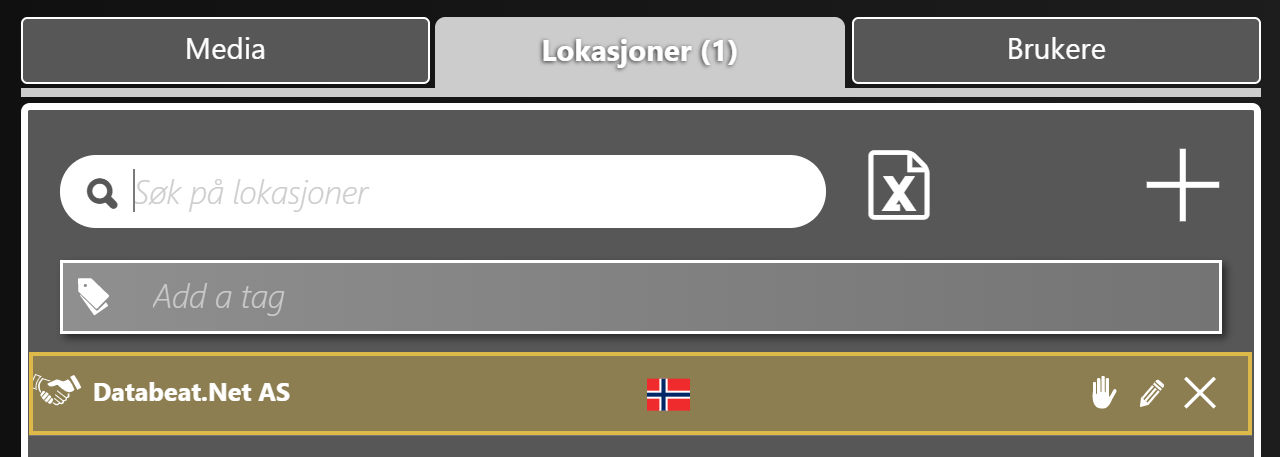
Step 1: Select the Location
- Log in to DatabeatOMNI, select the Locations Tab and find the location you want to use for the connection.
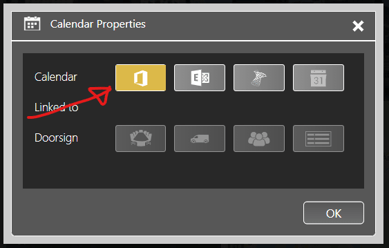
Step 2: Select Microsoft 365
-
Find and click on the calendar icon at the bottom of the Info tab (tight section).

-
In the popup window, select the Microsoft365 icon.
Step 3: Set the permissions
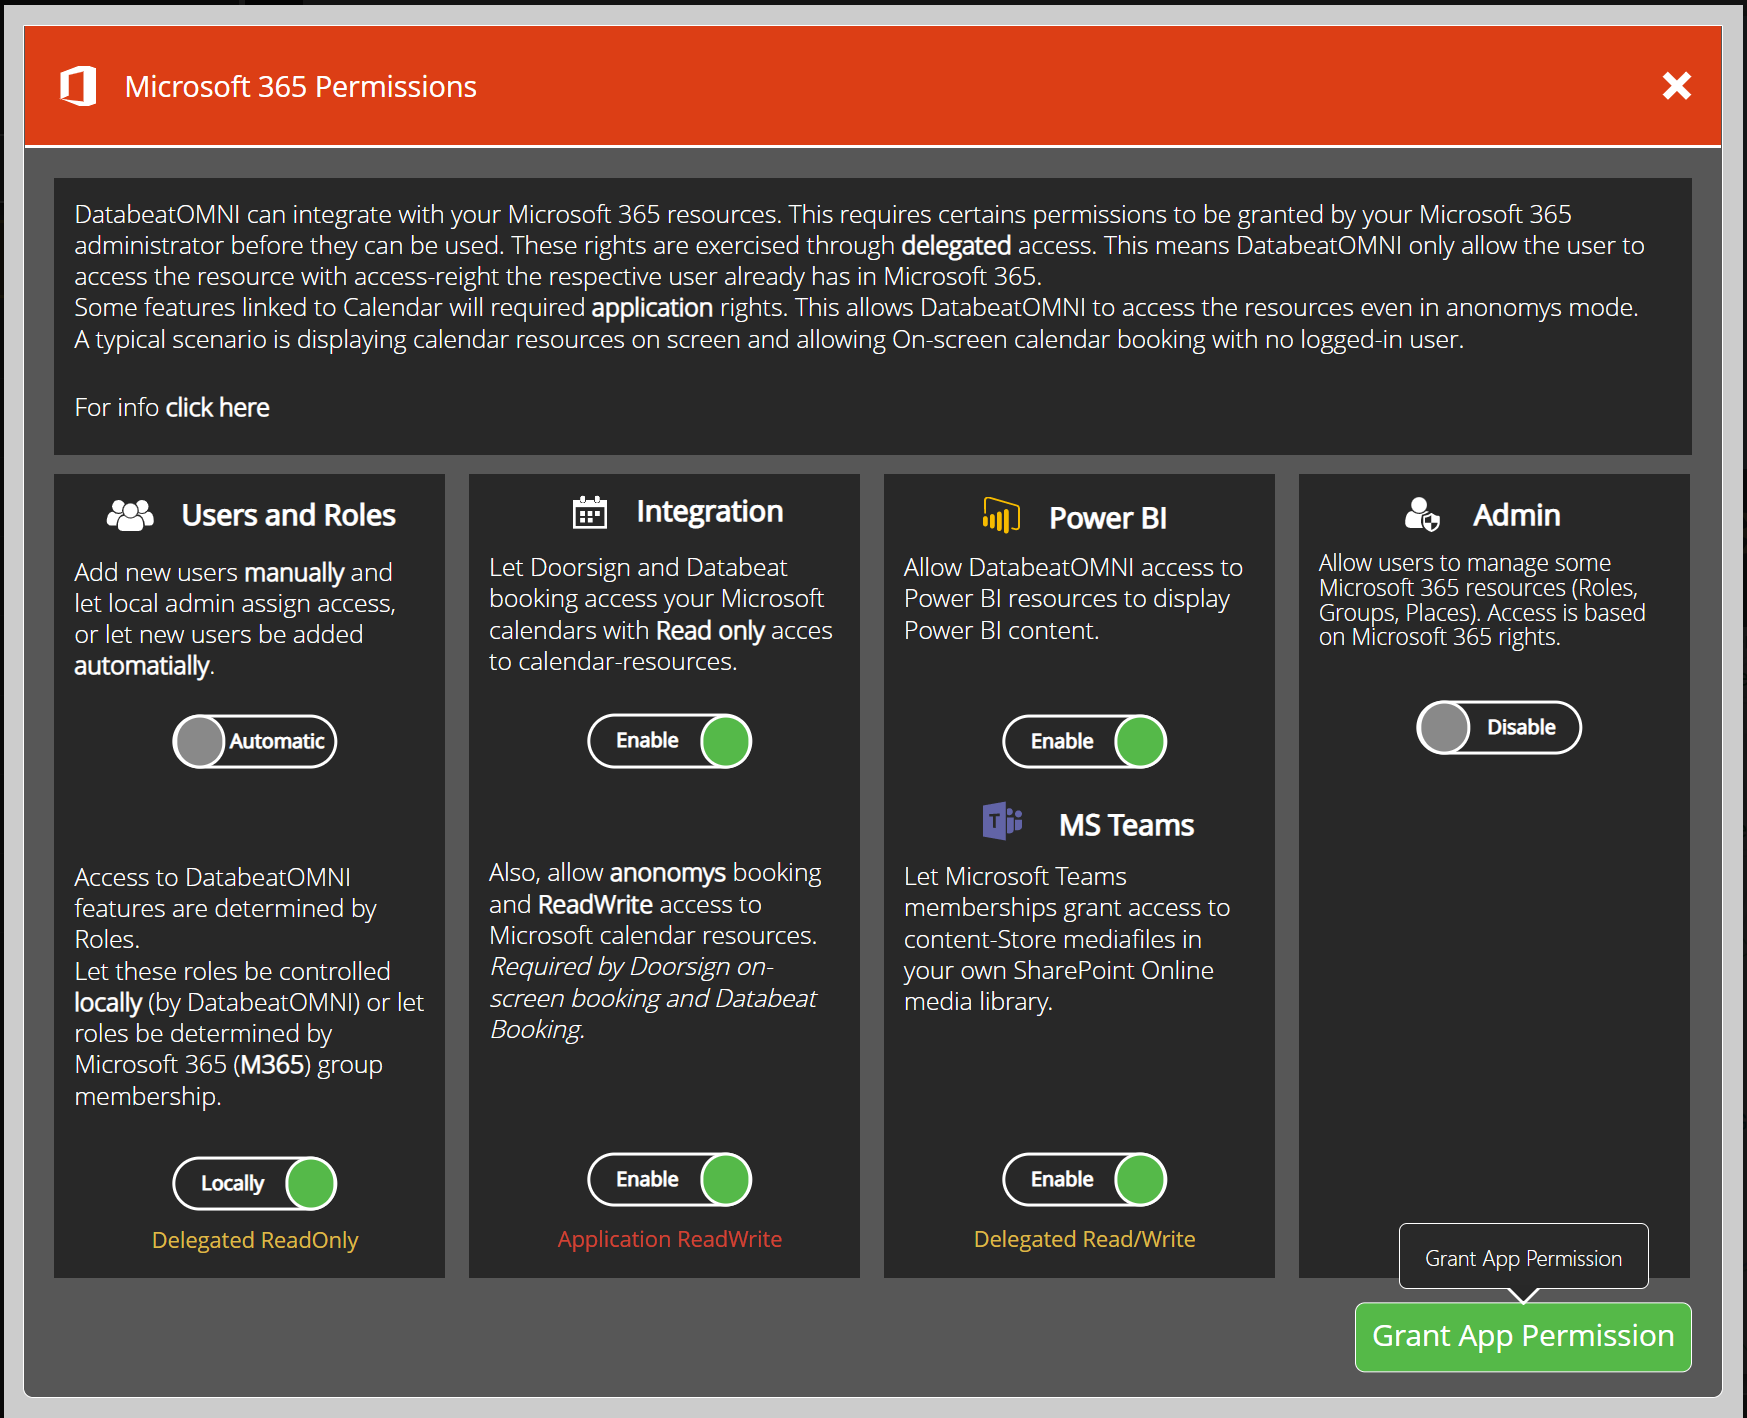
Permissions are grouped according to the type of use:
- Users and Roles To decide how to manage users and roles. These settings are based on Delegated permissions only and, by default, Read Only. (Use Admin settings to allow delegated write permissions).
- Calendar. For customers using Databeat Doorsign and Databeat booking. Here permissions are granted to Microsoft 365 calendars, discretionary on a ReadOnly or ReadWrite basis. Note that these are application rights. (see above).
- Power BI. For users that want to publish Power BI reports/Dashboards to Screens.
- MS Teams. For customers that want to use MS Teams groups (and ditto permissions) to separate and share content and Sharepoint Online to store media files, metadata for distribution.
Note: MS Teams-driven content and management is under development and in beta. For further information about this option, please contact Databeat Support.
- Admin This option is to extend users delegated ReadOnly rights to ReadWrite to allow users to also edit Microsoft 365 resources. These are still delegated permissions.
Save permissions
Click the Save button to save your permission settings, [Esc] or top right X to exit without saving.
The user will see messages from Microsoft for permissions that will be granted. These need to be confirmed.
Step 4: Verify the 365 connector
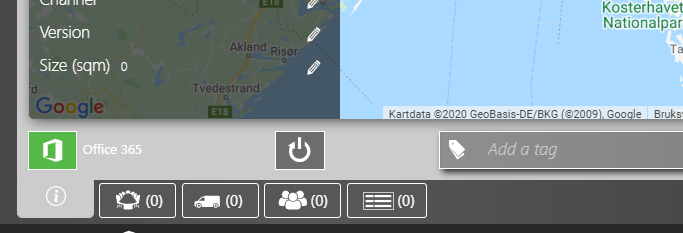
- Close the Office 365 dashboard and verify that Office 365 is displayed on Linked to.
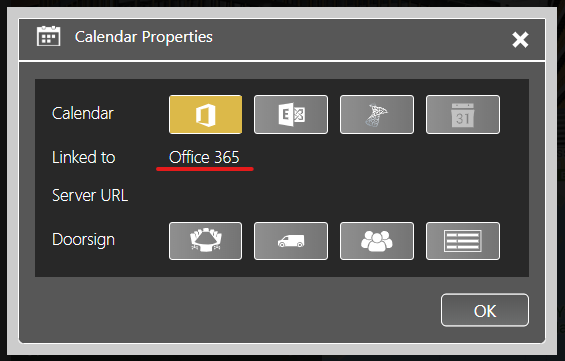
- Select which object type from Office 365 you want to create in DatabeatOMNI and select OK.
You can choose by clicking the icons for:
- Meeting rooms
- Equipment / other resources
- Users
- Overview
Please note that new tabs are visible in the Info tab on the location you selected.
You have now configured DatabeatOMNI with your Office 365 account!
The User Delegation Permissions you granted will only be used on behalf of the logged in user.
The App Permission you granted will be used by the OMNIplayer to show Doorsign content on a screen.
The first part is done and the next step will be to select the calendars you would like to show on screen. You can select to display one specific meeting room, resource or user by creating a Doorsign. Or you can select multiple objects with Overview.
Here is a guide to configuring Doorsign and Overview.
Configure Doorsign
In each of the tabs, there is now possible to configure the different types of door signs
Rooms, Recourses and People have the same setup.
The guide will here show how to set up meeting rooms.
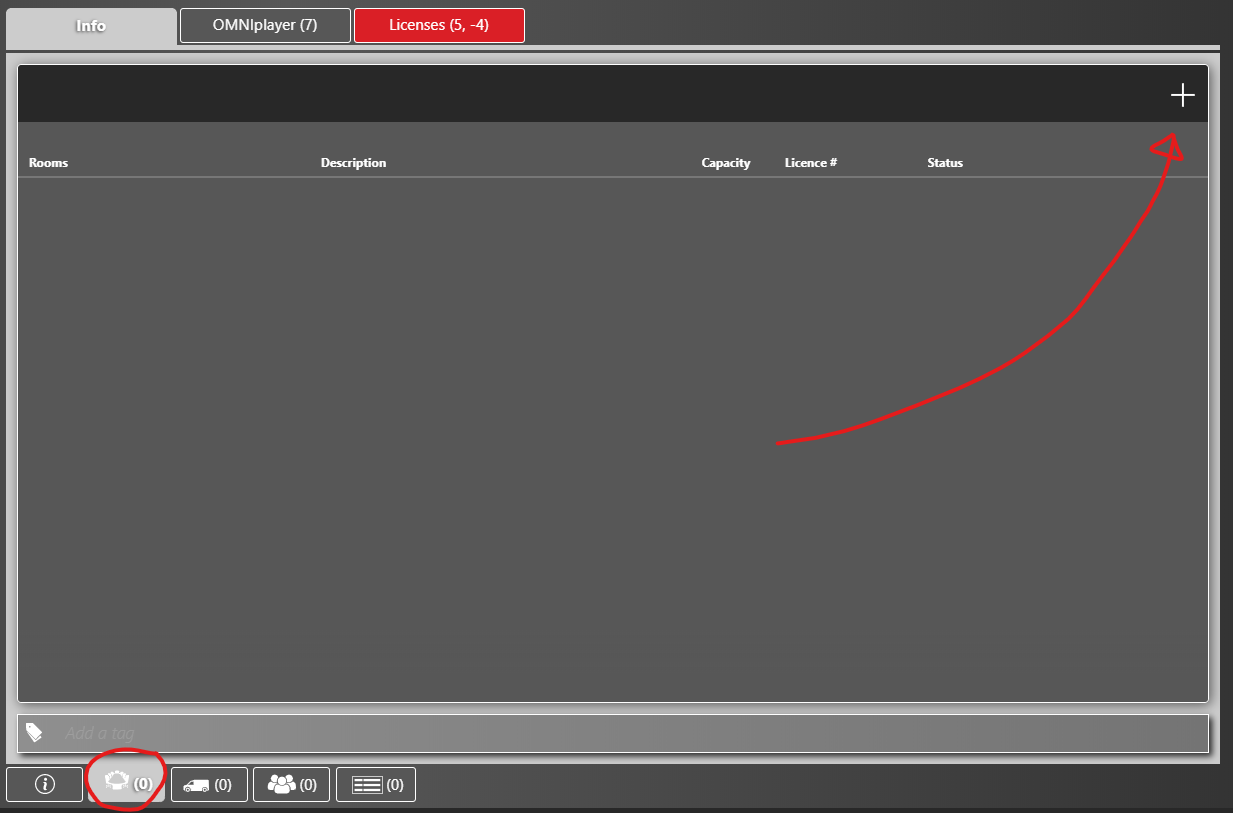
Configure Rooms
In the tab for rooms press the + in the upper right corner to add rooms.
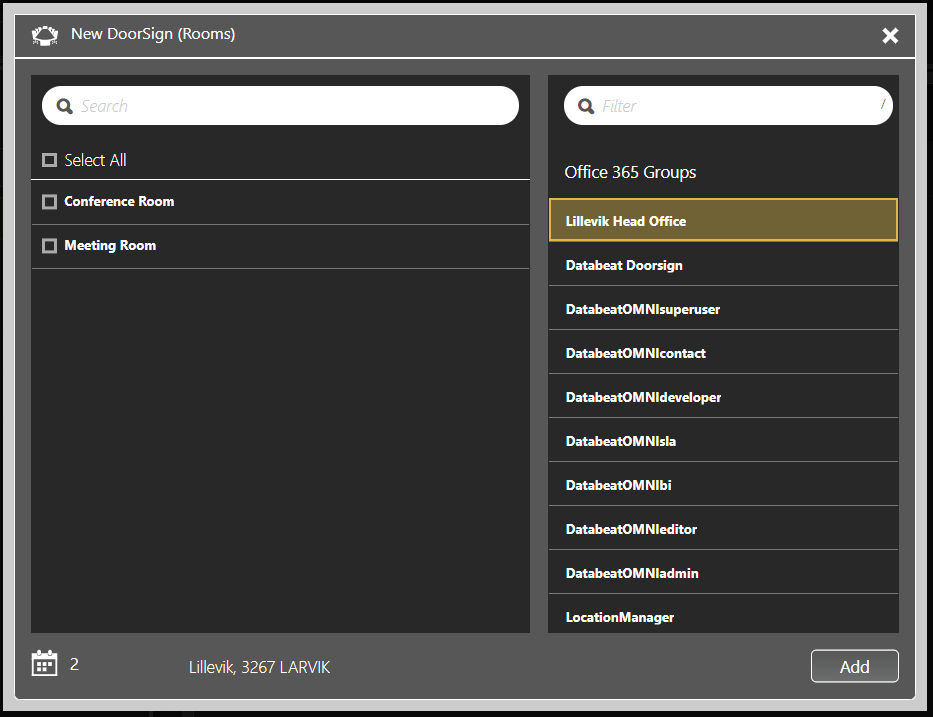
Choose the Office 365 groups to add the rooms from.
And then select the rooms to create door signs.
One or more groups is to be selected.
Press Add.
Rooms to be selected needs to be in an Office 365 group to be accessible for Doorsign.
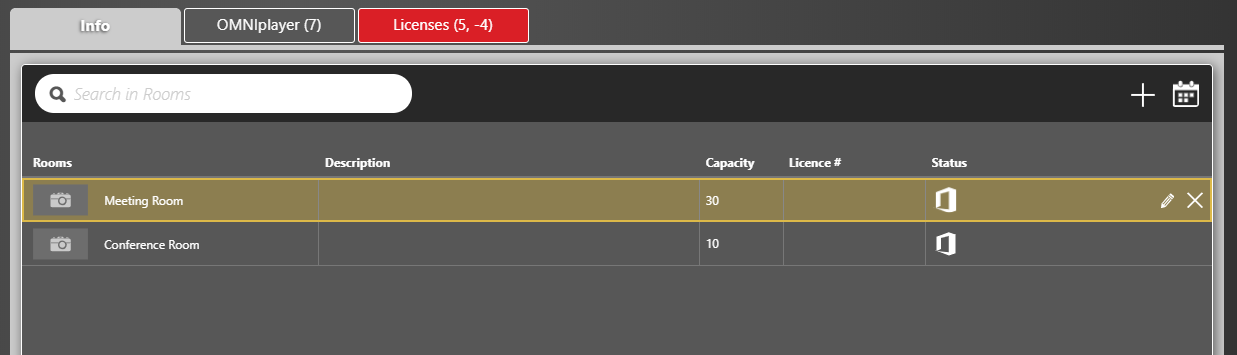
New rooms are now added
Here two rooms had been added.
Now the doors signs can be configured to create the player ID /Licence #
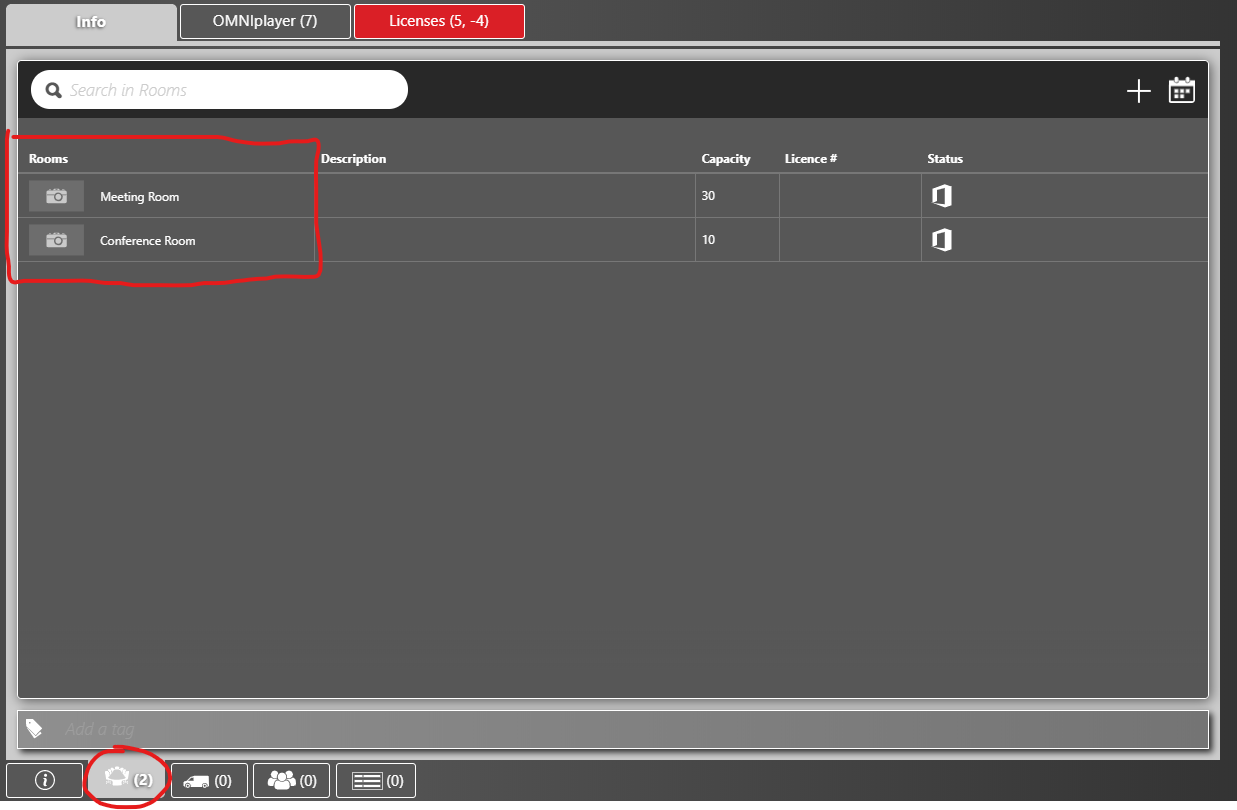
Select the room to be configured by:
- Double click on the room or
- Click on the pencil
Meeting room configuration
In this window, you can now configure the display of the Doorsign.
The preview is the actual display that will be visible on the Doorsign screen.
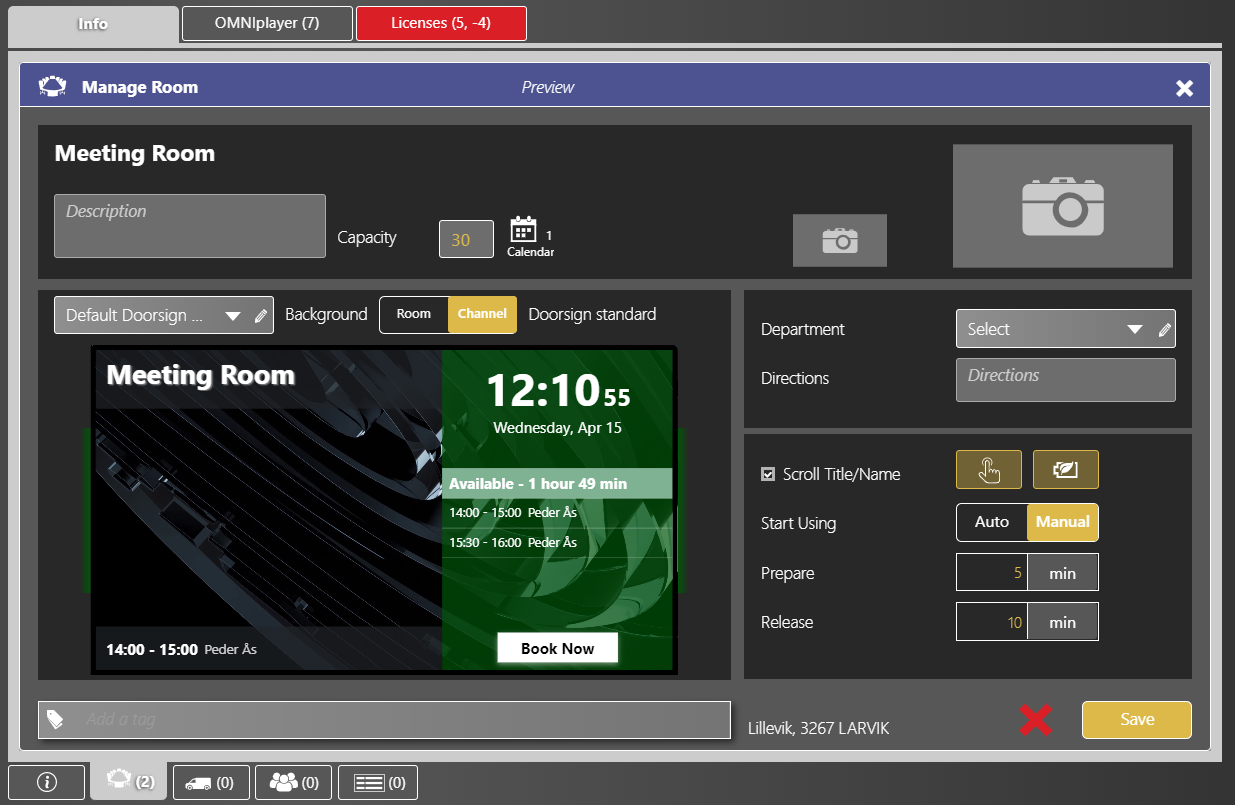
Press Save and the Doorsign configuration is finished.
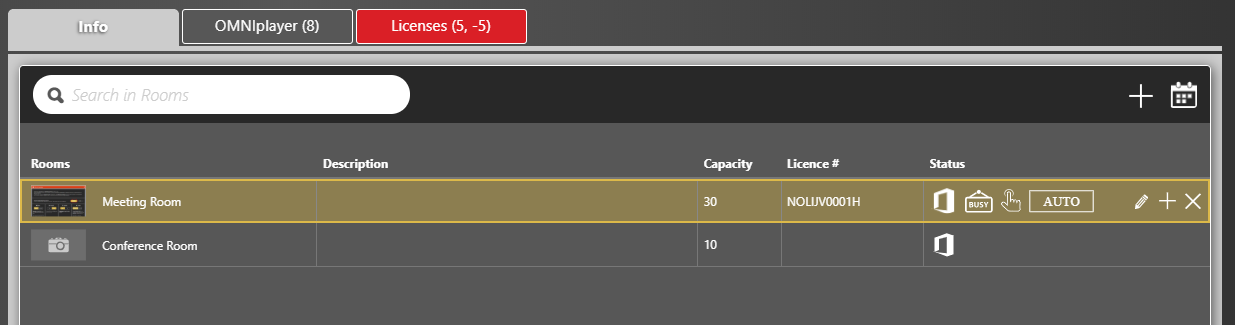
In the list of doors signs the Licence # is now created
This is the licence # needed to set up the Doorsign Screen.
The Doorsign options explained.
There is a lot of advanced options for the Doorsign setup.
Here is all fo the options explained below.
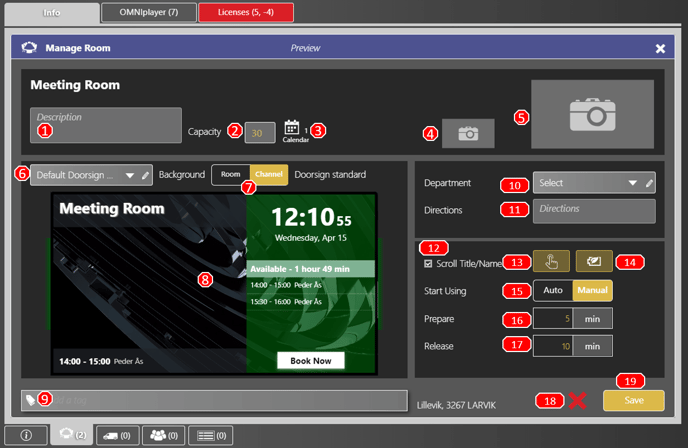
- Description of the meeting room, visible in the list of door signs
- The capacity of the meeting room, visible in the list of door signs
- Which calendar used for this Doorsign setup
- Thumbnail of the Doorsign, visible in the list of door signs
- Background picture for the Doorsign, if Doorsign Template Channel is not used
- Editing and changing the Doorsign template. Needs Editor Rights to change
- Background of Doorsign, Channel or Picture.
- Preview of the actual display of Doorsign
- Add tag for this Doorsign. Tags explained here.
- Department dropdown, editable fields
- Directions of the meeting room
- Titles will be truncated/scrolling
- Enable Touch
- Enable PowerSave. Uses Service Hours to turn on/off the screen
- Start using meeting room automatically or manually. Auto start according to the meeting set in the calendar. Manual needs to be started at the Doorsign panel outside the meeting room.
- Prepare time for meetings when manual start is chosen. Not possible to make drop in bookings close to next meeting than the prepare time is set.
- Release time for the meetingroom if manual s chosen. If meeting not manual started according to time set, the room will be available at the Doorsign screen and tin the calendar for the meeting room.
- Deleting the Doorsign
- Save the setup of the Doorsign.
Configure Overview
In each of the tabs, there is now possible to configure the different types of door signs
The guide will here show how to set up Databeat Overview.
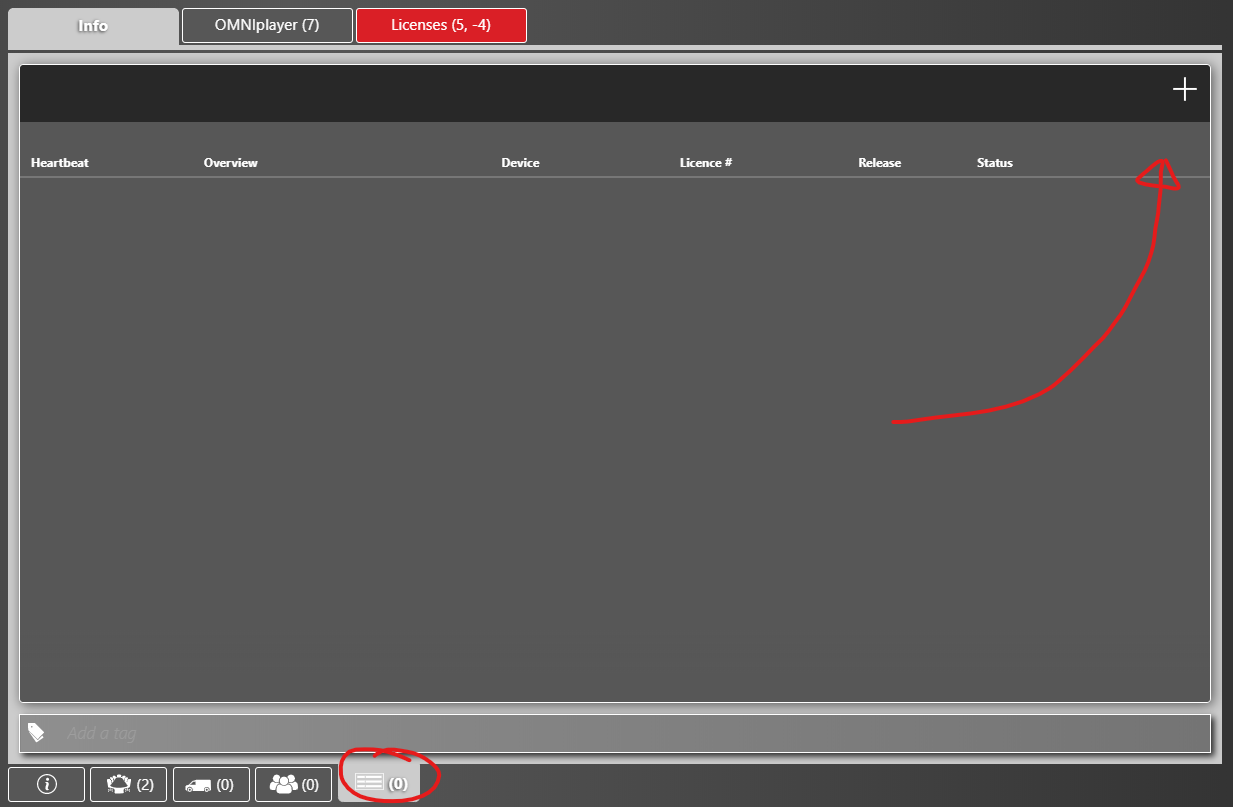
In the tab for overview press the + in the upper right corner to add new overview.
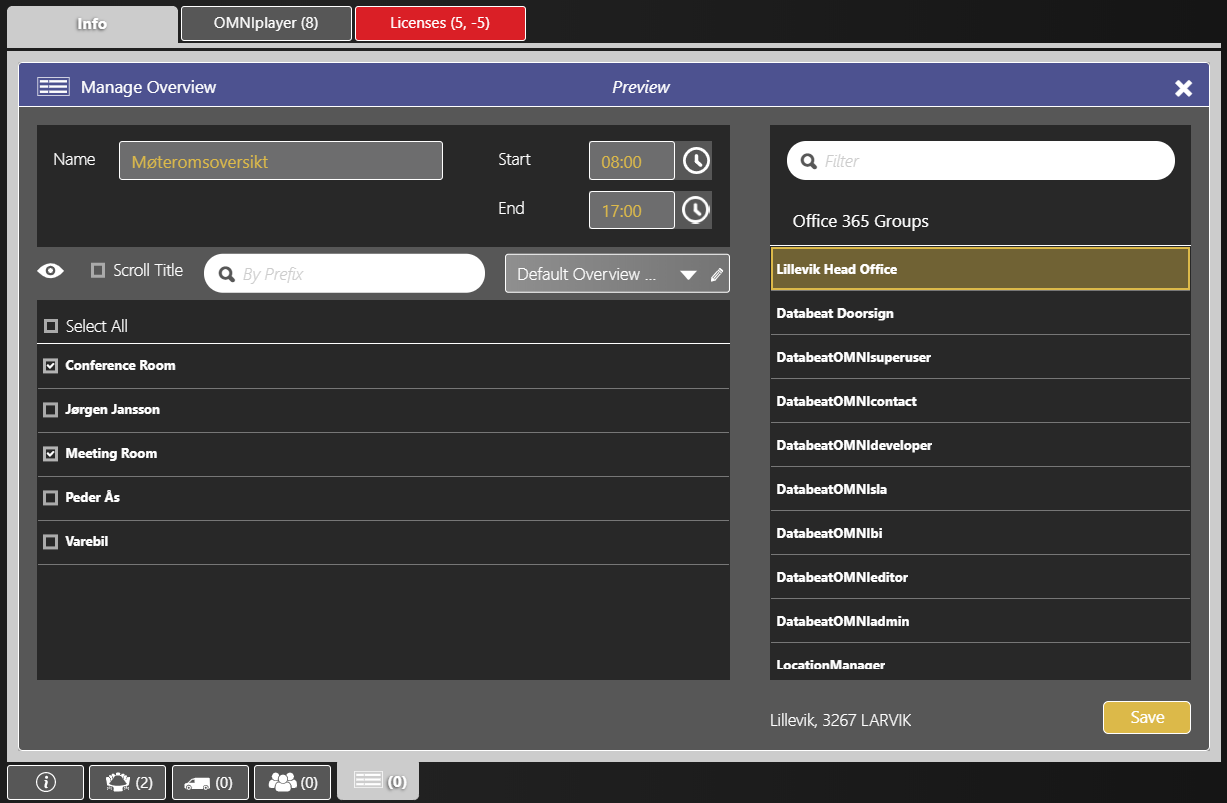
To configure Databeat Overview, choose the Office 365 groups to show.
Give the Overview a name and press Save.
Rooms, people or equipment to be selected needs to be in an Office 365 group to be accessible for Databeat Overview.
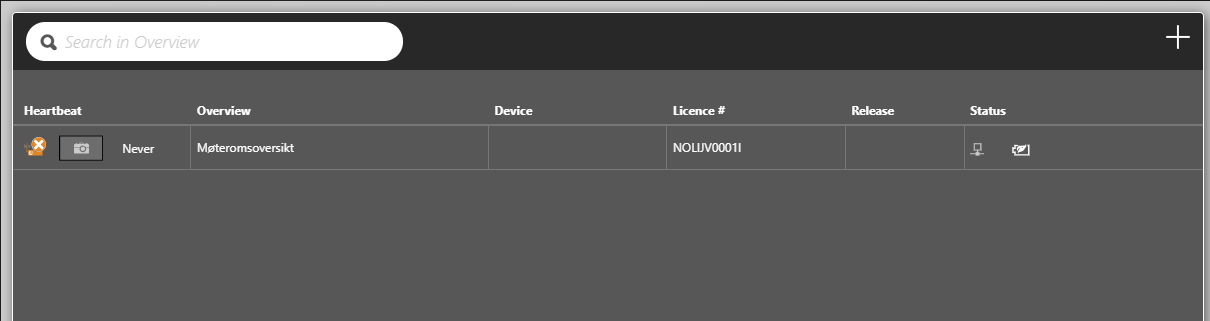
Now the new Overview is made, and the Player ID/ Licence # is visible and ready to be entered to the Overview screen.
The Overview options explained.
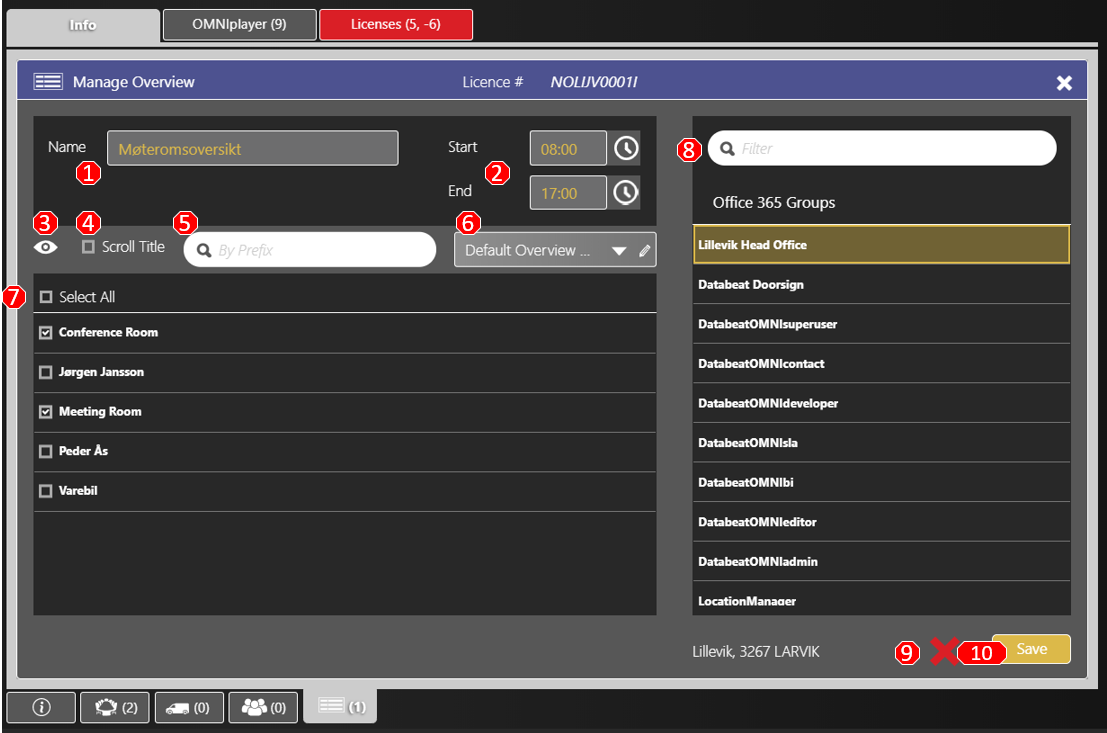
- Name of the Overview
- Starttime and endtime of the overview screen
- Preview of the Overview.
- Scrolling title when too many characters to show on screen.
- Search meeting rooms, equipment or people
- Change of the Overview template.
- Select which recourse to be shown on the overview screen.
- Search groups in Office 365
- Delete the Overview
- Save the Overview.