Content comes in all different sizes and shapes, but when used for digital signage the content has to be adapted and adjusted to fit a digital display. This article describes some easy-to-use methods to convert content to better fit your display.
This article is tailored for the common user in need of some basic knowledge about media and what to think about when displaying content on digital displays. Our suggestions to convert content in this article are based on our recommendations for file format for picture and video.
Tip: Start with figuring out what digital display you intend fit your content to. We have prepared some default questions to get you started:
- Should the content be displayed in portrait or landscape?
- What resolution does your digital display support?
Check the resolution of your media file
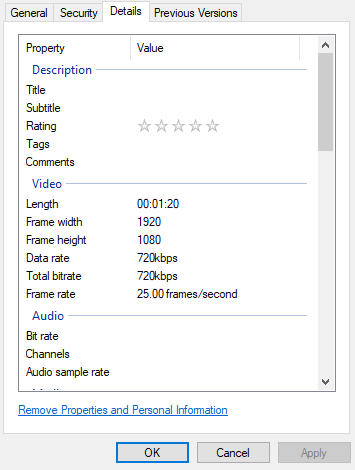
To see if your file has the correct resolution, you can right-click on the file and look at properties.
- Find your file in File Explorer.
- Right-click and select Properties.
- Click the Details.
- Check the information for width and height.

To change to the recommended resolution, we can use tools such as PowerPoint or Cloudconvert.com.
How do I use PowerPoint to change the resolution of my media files?
NB! This does not apply when using the PowerPoint Publisher Plugin for Databeat. Here, default measurements are set in the PowerPoint plugin.
PowerPoint calculates resolution measurements a little differently than pixels. PowerPoint uses centimeters (cm) for measuring pixels by default.
As an example: 50,8 cm gives 1920 pixels and 28,575 cm gives 1080 pixels.
This is how you use PowerPoint to change the resolution on a media file.
- Open PowerPoint on your computer

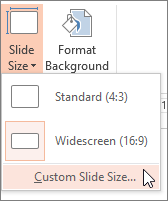
- Click Design
- Click Slide Size
- Click Custom Slide Size
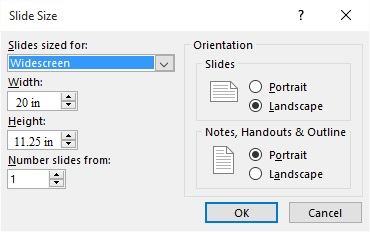
- Insert the customized measurements for width and height

If your image is to be adapted to 1920x1080 (Landscape), set these dimensions: Width = 50.8 cm / 20 in. Height = 28.575 cm / 11.25 in.
If your image is to be sized 1080x1920 (Portrait), set these dimensions: Width = 28.575 cm / 11.25 in. Height = 50.8 cm / 20 in.
- Design your slideshows from scratch or paste from file explorer.
If the image is stretched, you can use the crop tool in PowerPoint to adjust.
- Press File and select Save As.
Save as MP4 for video and animation or JPG or PNG for image.
- Your files will be stored on your PC and should be ready to be displayed on a digital display.
How can I use Cloudconvert.com to convert my files?
Cloudconvert.com allows you to convert files through their website. Here we will see how resolution can be changed and how to change the video codec and any other relevant settings on the file.
With the freemium offer, you have a limited number of conversions you can do per day.
Upload your media file to Cloudconvert.com
- Choose Select Files to open File Explorer. Find the folder where you saved the video you want to convert.
- Select the file and click Open.
- File names and file types are copied on the website.

- Click the Format button and select the desired option.
- Click on conversion settings for more advanced settings.
We recommend that video codec is set for H264 for use with digital displays.
- Click Okay.
- Click on Start Conversion which is located on the bottom of the page.

- Click on Download
- Your files will be stored on your PC and should be ready to be displayed on a digital display.
